OCI Monitoring 自带的监控指标
Configure Alarms and Notifications:
Configure alarms and notifications to monitor resources in your Oracle Cloud Infrastructure tenancy.
Configure Notification Topics and Subscriptions
Configure publishing messages for topics and subscriptions with the Oracle Cloud Infrastructure Notifications service.
Subscriptions using protocols that require confirmation, such as Email, remain in “Pending” status until confirmation is received.
- Under Application Integration, click Developer Services.
- Click Notifications.
- Select the compartment and click Create Topic.
- Enter a Name and Description.
- Click Create.
- Click the topic in the Name column.
- Click Create Subscription.
- Select an option from the Protocol dropdown:
- Function
- HTTPS (Custom URL)
- PagerDuty
- Slack
- SMS (for Monitoring and Service Connector Hub)
- Click Create.
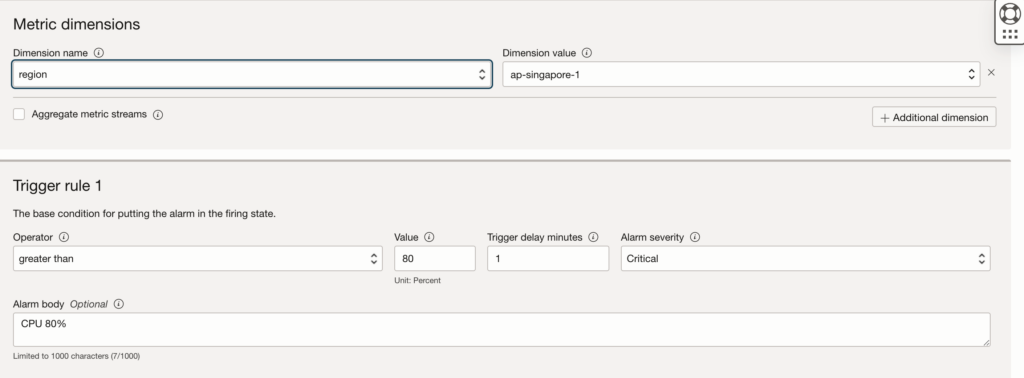
CPU使用率监控
◾️CPU使用率达到80%以上
・Metric namespace: oci_computeagent
・Metric name: CpuUtilization
・Statistic: mean()
・Trigger rule
Operator: greater than or equal to
Value: 80
测试CPU的使用率大于80%,yes命令
yes > /dev/null

yes 命令不断输出字符串。


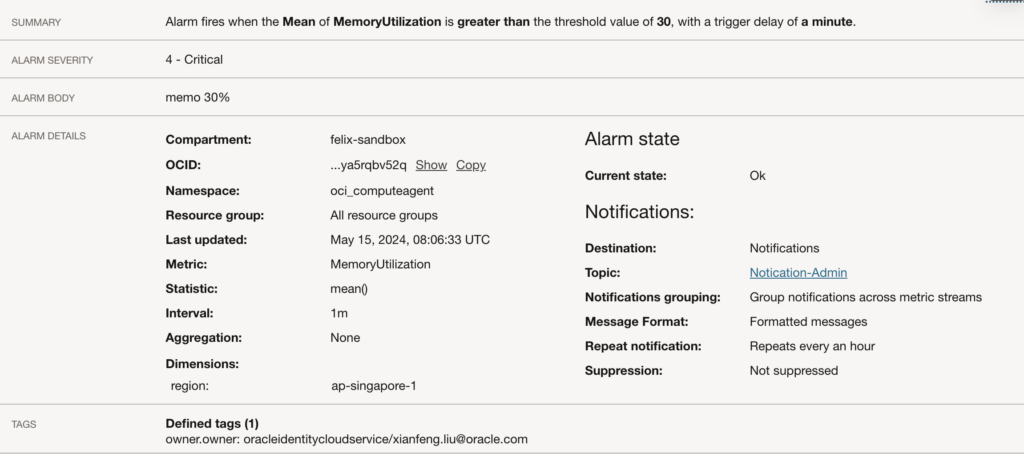
内存使用率监控
◾️内存使用率达到80%以上
・Metric namespace: oci_computeagent
・Metric name: MemoryUtilization
・Statistic: mean()
・Trigger rule
Operator: greater than or equal to
Value: 80

测试内存的使用量的python脚本: 初始化一个5个G的字符串 memo.py
import time
#1GB = 1024 * 1024 * 1024 字节
#5GB = 5 * 1024 * 1024 * 1024 字节
string = 'a' * (5 * 1024 * 1024 * 1024)
time.sleep(30 * 60)
网络通信是否正常监控
可以通过Monitoring服务里面的Health Check来实现监控有公网IP的的OCI服务。监控方法是可以是ICMP ping,也可以是TCP的相关端口。

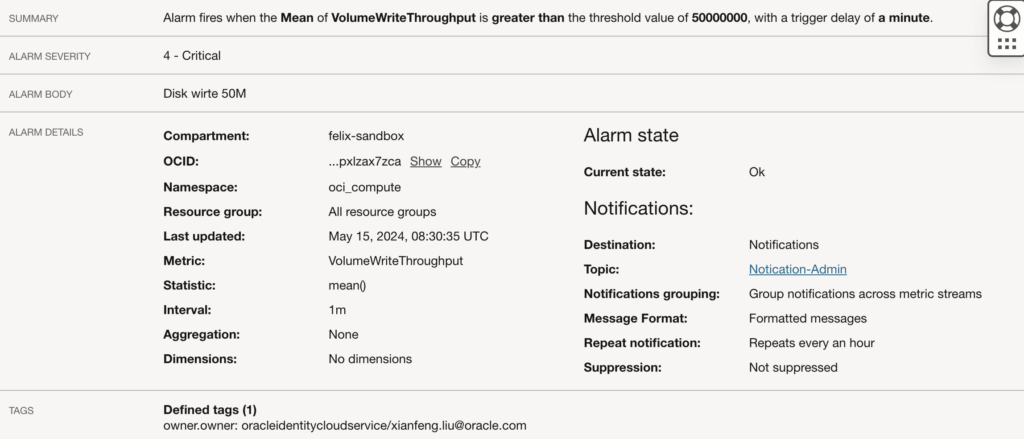
磁盘性能吞吐量监控
※硬盘使用率达到80%以上我没有找到合适的metric。

OCI Monitoring 自定义的监控指标
自定义磁盘使用率监控
OCI Monitoring不直接提供磁盘使用率的监控,用户也可能能够编写自定义的监控脚本或使用第三方工具来跟踪此指标。
通过 Oracle 可观察性和管理平台服务,客户可以监视、分析和管理多云应用和基础设施环境。它使用度量监视资源和预警,以便在这些度量满足预警指定的触发器时通知您。度量将作为原始数据点或时间戳值对以及维和元数据发送到监视服务。
度量来自各种来源:
- Oracle Cloud Infrastructure (OCI) 资源自动发布的资源度量。例如,CpuUtilization。
- 使用监视 API 发布的定制度量。
目标
使用 OCI 定制度量监视磁盘利用率。
先决条件
- 创建动态组以添加所需的策略。
# Replace compartment_ocid as per your tenancy
instance.compartment.id = '<compartment_ocid>'- 添加必需的策略:创建名称空间并为用户组提供权限,以便将度量推送到监视服务。
# Replace group-name as per your tenancy
Allow dynamic-group <group-name> to use metrics in tenancy
- 在计算实例上运行 OCI Python SDK 。
# Using Oracle Linux 7 or 8
sudo yum install python36-oci-sdk
- 对计算实例的 SSH 访问。
任务 1:创建 Python 文件
- 在需要收集磁盘利用率度量的计算实例中创建
disk_usage.py。注:使用基于操作系统的首选文本编辑器。 - 将以下示例脚本复制到
disk_usage.py。
# This is a sample python script to post disk utilization custom metric to oci monitoring.
# Command: python disk_usage.py

import oci,psutil,datetime
from pytz import timezone

# initialize service client with OCI python SDK
signer = oci.auth.signers.InstancePrincipalsSecurityTokenSigner()
monitoring_client = oci.monitoring.MonitoringClient(config={}, signer=signer, service_endpoint="https://telemetry-ingestion.ap-mumbai-1.oraclecloud.com")

# get disk usage with psutil
disk = psutil.disk_usage('/')
disk_usage=disk.percent
print(disk_usage)

times_stamp = datetime.datetime.now(timezone('UTC'))

# post custom metric to oci monitoring
# replace "compartment_ocid“ with your compartmet ocid and srv01 with your compute instance
post_metric_data_response = monitoring_client.post_metric_data(
   post_metric_data_details=oci.monitoring.models.PostMetricDataDetails(
      metric_data=[
            oci.monitoring.models.MetricDataDetails(
               namespace="custom_metrics",
               compartment_id="your_compartment_ocid",
               name="disk_usage",
               dimensions={'resourceDisplayName': 'srv01'},
               datapoints=[
                  oci.monitoring.models.Datapoint(
                        timestamp=datetime.datetime.strftime(
                           times_stamp,"%Y-%m-%dT%H:%M:%S.%fZ"),
                        value=disk_usage)]
               )]
   )
)

# Get the data from response
print(post_metric_data_response.data)
- 使用以下命令向脚本添加执行权限。复制
chmod +x disk_usage.py - 根据您的区域更新 telemetry 摄取端点。注:端点因操作而异。对于发布度量,请使用遥测测试端点。
- 根据您的要求更新名称空间。注:对于度量名称空间,请勿使用保留前缀(oci_ 或 oracle_)。
- 使用区间 OCID 和
srv01更新您的计算实例compartment ocid。 - 如果需要为同一计算实例收集度量,请在脚本中添加更多度量。下面是以 GB 为单位收集磁盘空闲空间的示例。
# get metric details using psutil
disk_free=round(disk.free/1024/1024/1024,2)
print(disk_free)

# Add more metric to post if required
post_metric_data_response = monitoring_client.post_metric_data(
      post_metric_data_details=oci.monitoring.models.PostMetricDataDetails(
         metric_data=[
               oci.monitoring.models.MetricDataDetails(
                  namespace="custom_metrics",
                  compartment_id="your_compartment_ocid",
                  name="disk_free",
                  dimensions={'resourceDisplayName': 'srv01'},
                  datapoints=[
                     oci.monitoring.models.Datapoint(
                           timestamp=datetime.datetime.strftime(
                              times_stamp,"%Y-%m-%dT%H:%M:%S.%fZ"),
                           value=disk_free)]
                  )]
      )
   )
任务 2:发布定制度量数据
- 从 CLI 手动执行脚本以验证成功。
python disk_usage.py

Output:
27.1
{
"failed_metrics": [],
"failed_metrics_count": 0
}
- 通过 cron 作业或调度任务调度脚本以将数据频繁发布到 OCI 监视服务。
- 在 crontab 中使用非 Windows 计算实例上的
crontab -e添加脚本详细信息。注:定制度量可以按频率发布,因为每秒和最小聚合间隔为 1 分钟。最佳做法是每隔 1 分钟或更长时间发布一次定制度量。
- 在 crontab 中使用非 Windows 计算实例上的
# Cron job example with every 1 min execution. */1 * * * * /usr/bin/python3 /home/opc/disk_usage.py- 使用
sudo cat /var/log/cron | grep disk检查 cron 日志中的输出。
任务 3:使用 OCI 度量浏览器查看磁盘利用率度量
- 打开导航菜单,然后单击可观察性和管理。
- 在监视下,单击度量浏览器。
- 选择包含要查看的定制度量的区间,然后单击度量名称空间的名称。例如,custom_metrics。
- 在资源下,单击度量。选择度量名称、间隔、维名称和维值。

- 单击更新图表可在度量浏览器中查看定制度量。
custom_metrics:
https://docs.oracle.com/zh-cn/learn/oci-custom-metrics/index.html#task-1-create-the-python-file
使用Stack Monitoring 可以完成磁盘利用率管理
磁盘利用率监控属于操作系统层面的指标了,IaaS 底层默认的指标一般监控不到,按照Felix提供的定制化方案,或者使用Stack Monitoring 可以完成磁盘利用率管理
https://docs.oracle.com/en/learn/stack-monitoring-vm/index.html#introduction
